Using QGIS, GeoServer, and PostGIS to Make and Maintain Arches 3 Overlays
 Adam Cox
Someone got in touch with me recently about using GeoServer to serve custom-made (and maintainable) vector overlays to the Arches MAP VIEW, in order to add specific study/research areas to the map. This can be achieved with a graceful integration of some solid open source technologies that Arches is primed to handle. Functionally, wouldn't it be great to edit your vector layers in Quantum GIS, and have the updates immediately visible in your Arches overlays?
Well, here are my thoughts:
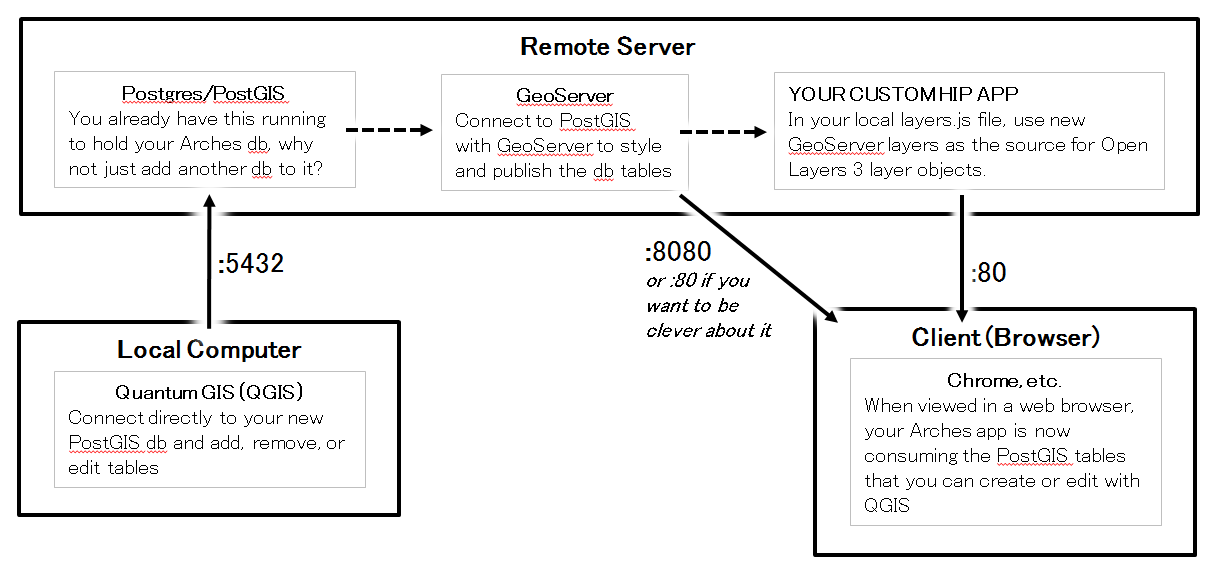
Or, narratively: Store your vector overlays in your existing PostGIS installation, and they can be directly edited there with QGIS (because it has great PostGIS support). These same tables can simultaneously published (and styled) by GeoServer as layers, which in turn can be fed to your custom app, and show up in the map.
Elements of this setup are already built into Arches, as you can read about here. There is already an "aux" schema within your app's PostGIS database, and with a little configuration you can create polygons whose name will be attributed to any newly created intersecting resource. This is a nice functionality, so you may want to use the following steps to just connect directly to these tables. The steps below will also cover the creation of a new database to hold your overlay tables, outside of the existing app db.
I followed these steps on an example Arches v3 installation. So in my case, "Remote Server" is an Amazon EC2 instance (running Ubuntu), "Local Computer" is my laptop with QGIS on it, and "Client (Browser)" is anybody looking at the website. To follow along you must have some sort of similar setup (or at least can fill in the blanks where necessary), and you must have a running GeoServer instance on your server.
SSH into your server, and create a new db to hold your tables
This is only if you want to create tables that are outside of your app's existing database. If you need to do re-installations of your app, you may want to follow this step because your app's database will be dropped and recreated blank on every re-installation. If you want to make tables in the existing database, just skip to the next section (and substitute the database name accordingly).
1. Once logged onto the server, use these commands to make the db:
~$ psql -U postgres
postgres=# CREATE DATABASE arches_overlays;
postgres=# \connect arches_overlays
postgres=# CREATE EXTENSION postgis;
2. That's all the SQL you need (though you could do most of the next step with SQL if you want). Use \q to quit the psql console.
Connect to the db with QGIS to make/edit the table
1. Open QGIS, and begin by creating a connection to the db.super easy on AWS)
You'll need to make sure you can get to your server through port :5432 for this step, which may mean firewall configuration (this is
2. Open the "Add PostGIS Layer" dialog, click "New", and enter the following:
Name = arches overlay db (or whatever you want)
Host = your IP address
Port = 5432
Database = arches_overlays
Username = postgres
Password = postgis
(this is the default username/password combo for a new Arches installation)
3. Click "Test Connection", and once you get it working click "Ok".
If you are going to use the existing "aux" schema tables in your app database, just find and add these now. You should see "parcels", "overlays", and "addresses". Be sure to refer back to the official Arches documentation if you're doing this. When you're done editing in QGIS, just skip to the GeoServer section below.
Otherwise, close the dialog box, and continue with steps 4-6.
4. Now, go to Database > DB Manager > DB Manager
5. Expand the PostGIS tab, expand your database, and go to Table > Create Table
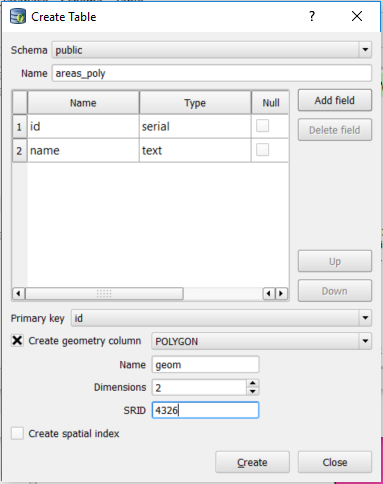
Now that your table exists, you can add it as a PostGIS layer and begin to edit it.
6. Re-open the "Add PostGIS Layer" dialog, and re-connect to your database. You'll now be able to select the new table, and use all the normal QGIS editing tools to add features to it.
Add your tables to GeoServer as PostGIS data sources
1. Log into your GeoServer instance, go to the "Stores" page, and click "Add new data source".
2. Choose "PostGIS" under Vector Data Sources, and enter the information necessary to connect to your database.
Now use localhost for the Host, because GeoServer and PostGIS are running on the same server
Be sure to enter the name of your PostGIS database
3. You'll now be able to publish any tables in your database.
Most of the information is already ready, but be sure to at least compute the bounding boxes.
4. Now you can style the layers all you like with GeoServer's SLD support.
Add your GeoServer layers as overlays in your Arches app
1. Finally, the easy part. All you need to do is open your layers file, found here:/hipapp/hipapp/media/js/map/layers.js and make a new layer object that uses your GeoServer layer for the source. The relevant portion of your javascript will look something like this:
 layer: new ol.layer.Tile({
    source: new ol.source.TileWMS({
        url: 'http://XX.XX.XX.XX:8080/geoserver/workspacename/wms/',
        params: {
            'LAYERS':'workspacename:layername',
            'TILED':true,
        },
        serverType: 'geoserver'
    }),
}),
2. Full instructions on how to add overlays to your layers.js file can be found here in the official Arches-HIP documention.
It's a lot of steps, but if you live in fantasy-land and don't run into any issues, it shouldn't take more than half an hour or so. And if you can get it to work once, the next time it will be more or less effortless.